


What the Camera Control Button Does and How to Best Use It
Using the Camera Control Button on iPhone 18 Pro
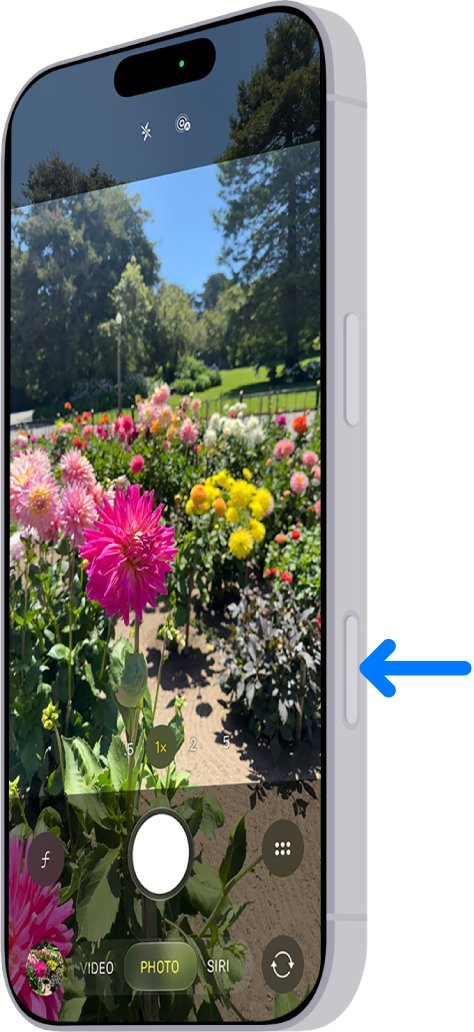
If you’ve picked up an iPhone 18 Pro, or any iPhone since the 16 lineup that has it, you’ve probably noticed the small flush button on the lower right side, just below the side button. That’s Camera Control. Most people use it as a shortcut to open the camera and never touch it again, which is a shame, because it can do a lot more than just that.
Apple’s Camera Control button reads a full click, a lighter half-press, and your finger sliding along its surface, and each of those physical commands offers something different. Once it clicks (pun intended lol), it starts to feel like a real camera with ergonomic handling.
Below is a mini breakdown on what every gesture does, how to set it up, and how I actually use it when I’m shooting on my iPhone.
The Camera Control “Gestures”
Think of Camera Control as having two levels of pressure. A full click works like pressing a shutter all the way down, like a normal camera. A light press is the halfway point, which is where most of the hidden features live.
- Click once to open the Camera app from anywhere, even the Lock Screen. With the camera already open, a click takes the photo. If you’re already in Video mode, it starts recording.
- Click and hold while the camera is open to record a video for as long as your finger stays down. Let go and the clip saves.
- Lightly press once to bring up the last setting you used; it also shows as a slider across the top of the viewfinder.
- Lightly press twice to open an overlay of every setting available in the mode you’re already in.
- Slide your finger across the button to choose between settings in that overlay, or to adjust the one you’ve picked.
- Lightly press and hold to lock focus and exposure (once you’ve turned it on, which I’ll get to below).
 Image via Apple. |
 Image via Apple. |
The Settings You Can Reach From the Button
You’ve got a total of six settings in the Camera Control overlay, but you won’t see all of them in every mode:
- Exposure brightens or darkens the shot.
- Depth adjusts background blur, and it switches you into Portrait mode if you weren’t there already.
- Zoom moves through your focal lengths.
- Cameras jumps between your lenses, including the front camera.
- Styles cycles through your Photographic Styles.
- Tone adjusts how bright or deep the shadows and midtones look within your style.
The workflow turns into second nature pretty fast. Double ‘light press’ to open the overlay, slide to the setting you want, light press to select it, then slide again to dial it in.
The phone will remember that choice, so the next single light press takes you straight back to it.
What about Aperture and Shutter Speed?
This is where things get a tad confusing on the iPhone 18 Pro.
The new Pro controls (Lens Aperture, Shutter Speed, White Balance and Histogram) don’t live on the button on the side of your phone. They’re tucked behind the Camera Controls button on screen, the little round icon with six dots sitting just to the right of the shutter. Yes, Apple gave it almost the exact same name as the physical Camera Control. No, they’re not the same thing. This acts as your quick-access shortcut and the six-dot icon as where the manual stuff lives.
Visual Intelligence
If you have Apple Intelligence turned on, click and hold the button when you’re not already in the native Camera app, and it opens Visual Intelligence instead.
From there, just point your phone at whatever you’re curious about. Aim it at a restaurant and it’ll pull up the details. Point it at a sign and it’ll translate or summarize the text for you. Point it at a plant or a dog at the park, and it’ll tell you what you’re looking at. You can also search for similar items or ask questions about whatever’s in front of you.
This is a big saver. As a gardener who loves plants, I can pull up any flora or fauna on the road to see its species. And yes, so far, it’s been super accurate.
Setting Up Camera Control
Most of the useful customization lives in Settings > Camera > Camera Control.
- Launch with a double click. If the button keeps firing off in your pocket or bag, switch the launch gesture from Single Click to Double Click.
- Choose what it opens. It doesn’t have to open the Camera app. You can point it at Code Scanner, Magnifier or a supported third-party camera app instead.
- Customize the overlay. Under Customize, you can pick which settings appear when you double light press, and in what order. Put the ones you use most at the front.
- Turn on Lock Focus and Exposure. This is the AE/AF lock I mentioned earlier, and it’s off by default.
- Clean Preview. Light pressing hides most of the on-screen interface by default so you can see your whole frame. If you’d rather keep your controls visible, toggle this off.
For pressure and sensitivity, head to Settings > Accessibility > Camera Control. There you can make the light press firmer or softer, change how quickly you have to double light press, or turn off the light-press adjustments entirely. You can also switch Camera Control off completely if it just isn’t for you (sometimes it annoys me).
 Image via Apple.
How To Best Use Camera Control
Shoot horizontally like a real camera
Flip your phone sideways and Camera Control lands right under your index finger, pretty much exactly where the shutter button sits on a mirrorless rig. Grip the phone with both hands, click with one finger, and shots come way steadier than when you’re poking at the screen.
Lock, then recompose
Turn on Lock Focus and Exposure, aim at your subject, then light press and hold until AE/AF Lock pops up above the frame. Now you can reframe however you want, and your focus and brightness won’t budge. I use it constantly for portraits when I want the eyes tack sharp but the person off to one side.
Keep Exposure close by
Camera Control remembers the last setting you used, so if you leave it on Exposure, a single light press and a quick slide is all it takes to rein in any cranky blown-out highlights.
Zoom without covering your shot
Sliding your finger along the button to zoom keeps your hands off the viewfinder, so you can actually see your whole composition as you push in.
Use the volume buttons for video
Here’s a little backup trick. In video modes, either volume button also starts and stops recording. So if Camera Control feels awkward in a certain grip, you’ve got options.
The more you lean on Camera Control, the less you’ll touch the screen, and honestly, that’s the whole point. It turns your iPhone into something you actually shoot with, not just something you tap on.
Read more

Davey tests iPhone 18 Pro aperture control, shutter speed, white balance and the histogram with Moment Mobile II lenses, the VND QuickLock filter and new cases.
A clear breakdown of every iPhone 18 Pro focal length, from the 13mm Ultra Wide to the 200mm crop, plus which real lenses vs. crops to use when.