

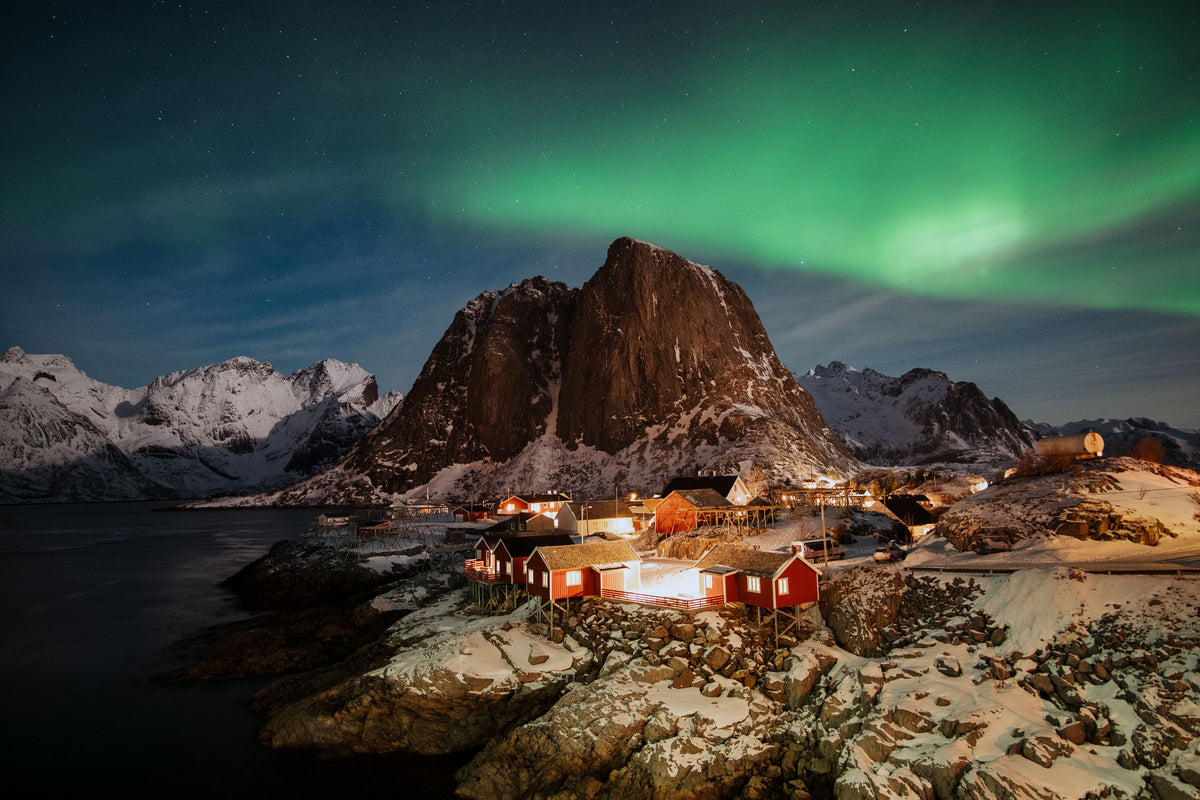
9 lugares para fotos para un viaje por carretera de invierno por las islas Lofoten
9 Photo Spots for a Winter Road Trip Through the Lofoten Islands
The Lofoten Islands have blown up in popularity over recent years for good reason.
The roughly 3-hour drive from Svolvaer to the village of Å at the end of the road in Lofoten packs in some of the most wildly beautiful landscapes imaginable, with dramatic mountains plunging into fjords and pristine beaches. Tiny, colorful fishing villages like Hamnøy and Sakrisøy have become the postcard scenes from these arctic islands, but there’s actually so much more to see beyond those places to stop and explore.
While Lofoten sees an abundance of visitors year-round, winter is a slightly quieter time with the bonus of being able to catch the northern lights. It’s not as cold as you might think for a place at such a high latitude. In February, the temperature fluctuated around freezing (32ish degrees Fahrenheit), and some days were snowy while others it rained. Precipitation of one kind or another is pretty much guaranteed, so it’s definitely a place that will require you to have weatherproof gear. I was worried about the short days not giving me enough time to see the landscape in the daylight, but by February, the days were already quickly getting longer. At the middle of the month, the sun was rising around 9 am and setting around 3:30 pm, but the light faded slowly, and the hour or so before sunrise and after sunset proved to be some of the most beautiful times of day.
After some time in southern Norway, I flew to Svolvaer to start a 10-day road trip across the archipelago. At the time, I didn’t know what to expect beyond some of the famous views I’d seen on the internet. After days on end of driving and trudging through snow, I’ve compiled this list of my favorite places to photograph in the Lofoten Islands. If you visit Norway and the Lofoten Islands (spoiler alert: I do highly recommend it), please keep in mind that these are fragile places under immense strain from a recent increase in tourism. Always follow the rules of the road, never park your car anywhere you shouldn’t stop, and give this wild place the respect it deserves.
Some Notes on Photographing the Northern Lights
This isn’t meant to be a technical guide, but I’ll share a few general rules of thumb and tips for capturing the northern lights based on my own experience. I’ve managed to catch the northern lights in Alaska, Iceland, and in my own neck of the woods in New England, but I’ve never seen them as vibrant and dramatic as in Norway. They do actually dance like ribbons of light across the sky, and they can appear and disappear within seconds. Patience and extra warm layers are probably the two most important things to have when photographing the northern lights.
We use the KP index as a standardized measurement that quantifies how much of Earth’s magnetic field is being disturbed by solar activity and geomagnetic storms. The KP index ranges from 0 to 9, with a higher value representing stronger geomagnetic activity. It’s important to note that this is a global measurement taken from 13 different observatories around the world, and a higher or lower value doesn’t always correlate with better or worse odds of seeing the northern lights.
Depending on where on Earth you are, you don’t always need a high KP index to see the northern lights. Cloud cover is another important variable (especially in Lofoten) that dictates whether or not you’ll be able to see them. In general, I’d recommend using the KP index as a loose indicator but not a guarantee in either direction, and always check the weather to see forecasted cloud movement. The highest KP index I saw in Lofoten was a 4, and nights where it was only a 2 still brought a show.Note for photographers.
You can photograph the northern lights using pretty much anything, and an iPhone or smartphone is probably the easiest guarantee at capturing them today. If you’re using a camera, you’ll want to have a wide-angle lens with a relatively fast aperture (ideally 2.8 or faster), a tripod, and maintain as fast of a shutter speed as possible while keeping your ISO at a tolerable level. You don’t want to simply shoot long exposures because you’ll end up with a shapeless blob of color and star trails. Most of my favorite images from photographing the northern lights in Lofoten were with my 24mm 1.8 lens at its widest aperture, with a shutter speed ranging from 3 to 5 seconds, and my ISO between 1600 and 3200. The important thing is to pay close attention to ambient light in your surroundings (i.e. lights from houses, villages nearby, etc.) and the intensity of the aurora. There were some instances where it looked like someone flipped a switch, and concentrated areas became so bright that I had to quickly adjust by lowering my ISO or using a shorter shutter speed. Scouting locations during the daytime is a good way to be prepared at night when you sometimes need to act quickly to capture the northern lights from an interesting vantage point.
1. Henningsvaer
Note for photographers
While photographing the fishing scenes, always keep in mind that these are working piers and never trespass anywhere you shouldn’t be. Be respectful of the people working and pay attention to your surroundings.
 |
 |
 |
 |
 | |
2. Ballstad
Note for photographers
Since this village faces east, it’s also a good spot to catch a sunrise if you happen to be nearby.
 |
 |
 |
 |
 | |
3. Unstad
A note for photographers
If you’re looking to capture surfers here, check the surf reports before visiting
 |
 |
 |
 |
 | |
4. Hamnøy
A note for photographers
There’s a parking lot just before the bridge where you can leave your car (please never pull over on the side of the road anywhere you’re not supposed to, you’re risking your own life and someone else’s for something that isn’t worth it). While the northern lights made scenes that looked like a postcard, I found the mornings here to be my favorite time, since you can catch the alpenglow and soft light on the mountains just before sunrise. Try to arrive 30 minutes to an hour before sunrise time if you want to see this in the mornings.
 |
 |
 |
 |
 |
 |
 | |
5. Sakrisøy
Note for photographers
Be respectful of private property while walking around any of the villages in Lofoten. In general, if you’re walking on a road, it’s fine to take photographs, but keep in mind that this is a real place where people live and work, and respect the privacy of locals.
 |
 |
 |
 |
 |
 |
6. Reine
Reine is one of the most iconic, well-known villages in the Lofoten Islands and is home to a handful of inns, hotels, bakeries, and restaurants. I stayed here for a few nights, which made photographing the northern lights relatively easy, since I didn’t need to drive anywhere for some of the best views. Unfortunately, the nights I spent here were mostly cloudy, and the best I managed to capture were some faint glowing green skies.
Even if you don’t catch the northern lights, I think nighttime in Reine is beautiful to photograph because there are tons of views of the iconic red fishing huts against a backdrop of towering mountains. I used these nights when I couldn’t see the northern lights to practice finding strong compositions, which helped when the northern lights were visible, since I quickly knew where I wanted to go.
Note for photographers
There’s more to this area than the handful of views that the entire world has seen before. Once you’ve spent a few minutes seeing those, I recommend spending more time walking around and watching closely as the landscape changes from point to point.
 |
 |
 |
 |
7. Nusfjord
Note for photographers
Nusfjord is a protected, historic fishing village, and the main center near the docks is car-free. Paid parking is located a short walk outside of the village at the entrance. Since cars are restricted here, it’s one of the best places to capture postcard views of the village and the surrounding fjord.
 |
 |
 |
 |
 |
 |
 | |
8. Kvalvika Beach
Note for photographers
There are paid parking areas in Fredvang which you can navigate to when driving here. A wide-angle lens is going to be your best friend to capture this enormous landscape from the beach.
 |
 |
 |
 |
9. Å
Note for photographers
There are a few viewpoints in Å that you can walk out to, which face the sea and the surrounding mountains. These all offer differing viewpoints and are good spots away from ambient light to capture the northern lights when it’s dark.
 |
 |
 |
 |
 | |
💌 There's More!
Enjoyed this read? Subscribe now and receive all the latest and greatest articles straight to your inbox. All original. Community first. 100% ad-free.
Leer más
10 Epic Pacific Northwest Photo Spots as a Long Distance Runner 1. The Enchantments Leavenworth, WA Whether you live in Washington or not, chances are you’ve seen photos...